May 15, 2022Last modified April 2, 2023

Live updating page views with Supabase and Next.js

Please read

This post was written for the (now stable) beta Next.js middleware. If you want your own analytics, I recommend looking at Vercel's solution.

This post starts with a brief introduction. If you want to jump down to the tutorial, click here. You can also see the live updating views in action in the top right of this page! The analytics events themselves require no JavaScript and occur completely on the server thanks to the new (in beta) Next.js middleware. If you have JavaScript enabled, the view count should live update thanks to Supabase Realtime. You can try it by opening the page in a new tab and eyeing the view count.

Contents

Motivations

When possible, I avoid requiring JavaScript and exposing my users to unnecessary tracking. The problem is that I decided I wanted to track views on my blog, and Next.js analytics don't provide the vanity metrics I'm looking for. I previously used Matomo analyzing my nginx log, and while matomo is a fantastic piece of open-source software, I don't want to mess with the PHP API (or use PHP for the first time in ~7 years) in order to get post views on the front-end.

Coincidentally, Supabase announced their Series B a few days ago, and that pushed me to finally give it a try and see how their product works. If you're unfamiliar with Supabase, they're an open-source Firebase alternative with a hosted option: you get a postgres database and fancy dashboard and CLI for creating tables, edge functions, authentication and more. They also make it incredibly easy to subscribe to database updates, making syncing and connectivity a breeze.

So far, I love everything about it except the dashboard: everything is so slow. Creating a new, unnamed SQL query can take 5 seconds:

Dashboard slowness aside, this tutorial will walk you through using Supabase and Next.js middleware to have live-updating view counts and server-side analytics.

How

Note that this tutorial expects you to already have a Next.js project. If you don't, I recommend following the official Next.js tutorial.

Supabase: Setting up the Database and Realtime

  1. Register an account with Supabase here: https://app.supabase.io/

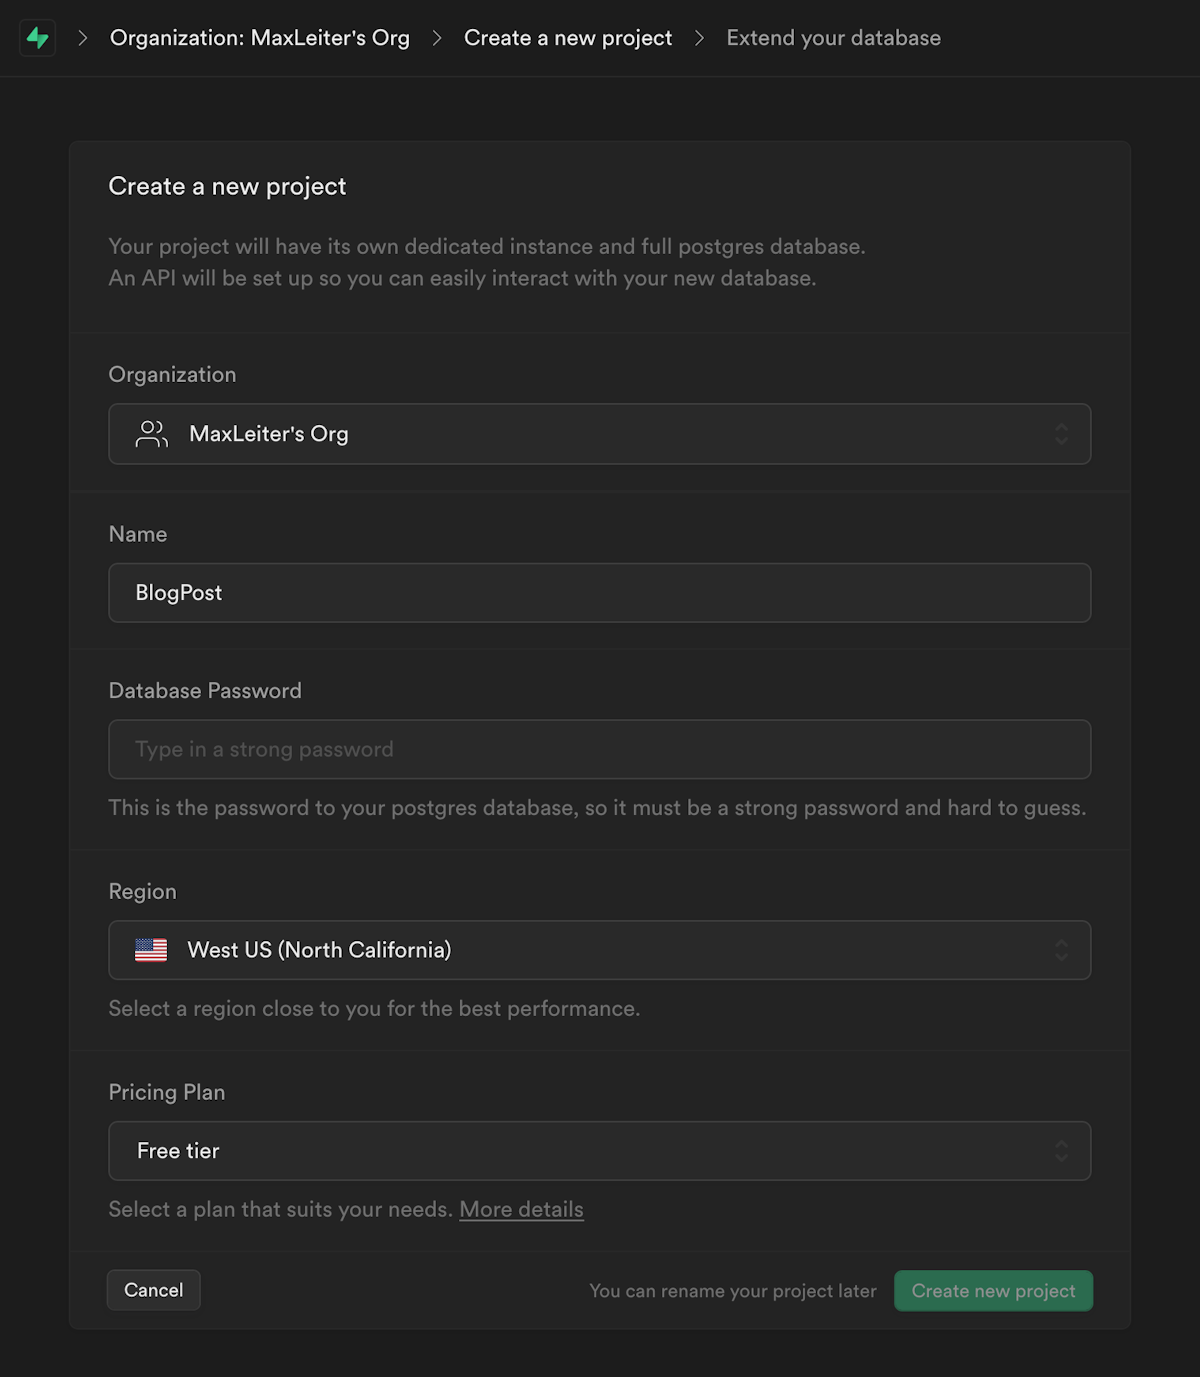
  2. Create a Supabase project and fill out the new project form.

    A screenshot of the Supabase page with the New Project button clicked

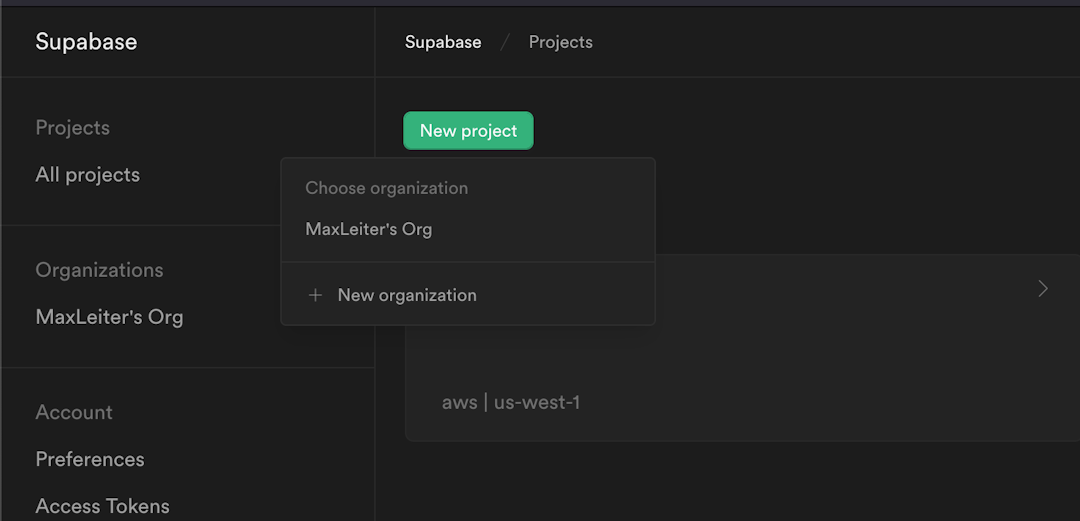
    If the above step confuses you, you need to click your organization in the dropdown of the 'new project' button. That took me a little too long to figure out...
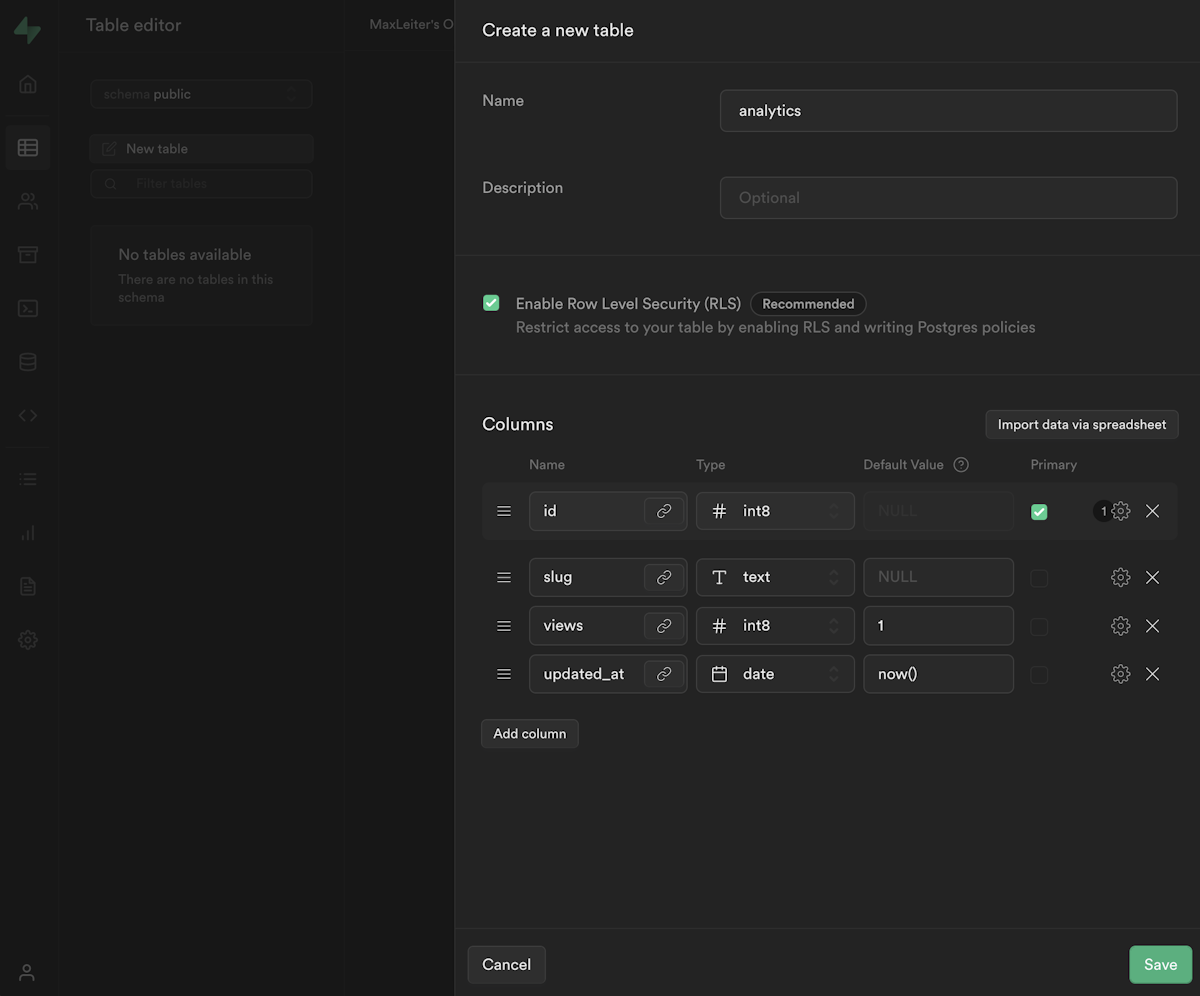
    A screenshot of the Supabase new project page

  3. Navigate to the Table Editor in the left nav bar and click new table. Fill it out to match below, and be sure to click the gear icon to deselect allowing null: A screenshot of the new table field showing 4 columns: an int8 ID, a text slug, an int8 views with a default value of 1, and an updated_at date column with a default value of "now()". Alternatively, if you're comfortable with SQL, you can write and save a SQL query that you can use again in the future. It may look something like this:

    CREATE TABLE analytics (
    id bigint GENERATED BY DEFAULT AS IDENTITY PRIMARY KEY,
    slug text UNIQUE NOT NULL,
    views bigint DEFAULT 1 NOT NULL,
    updated_at timestamp DEFAULT NOW() NOT NULL
    );
    CREATE TABLE analytics (
    id bigint GENERATED BY DEFAULT AS IDENTITY PRIMARY KEY,
    slug text UNIQUE NOT NULL,
    views bigint DEFAULT 1 NOT NULL,
    updated_at timestamp DEFAULT NOW() NOT NULL
    );

    You can input the query in the SQL Editor tab in the left nav bar a few options below the Table Editor.

  4. Now, we need to add a stored procedure (AKA a stored SQL function we can call from the Supabase API). Navigate to the Database tab in the left nav bar and select the Functions menu item inside:

    A screenshot showing the functions menu item location in the sidebar

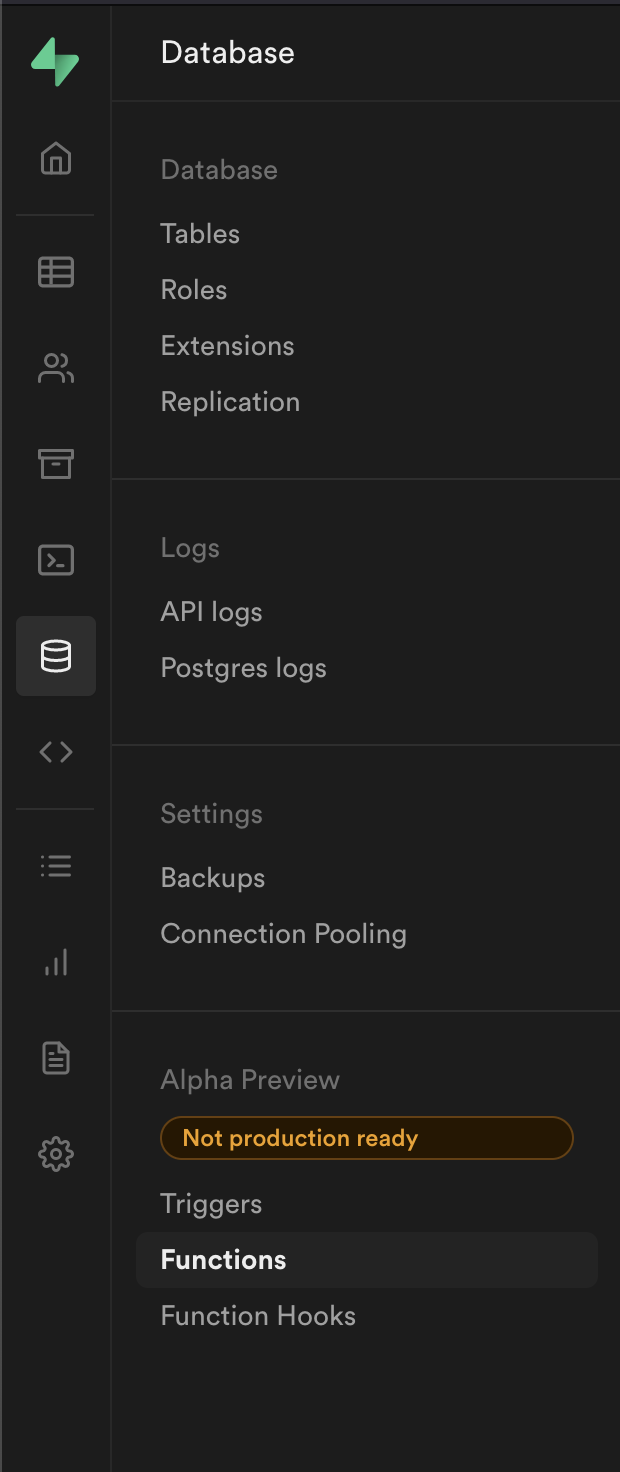
    Note that Supabase offers Database Functions and Edge Functions — we're using Database Functions!

  5. Click Create a new Function in the top right and and fill the settings out to match below. We're establishing a name we can use to reference the function, the schema (AKA what tables it has access to), the return value (void in this case), and a single argument that is the page path. A screenshot of the function creation view

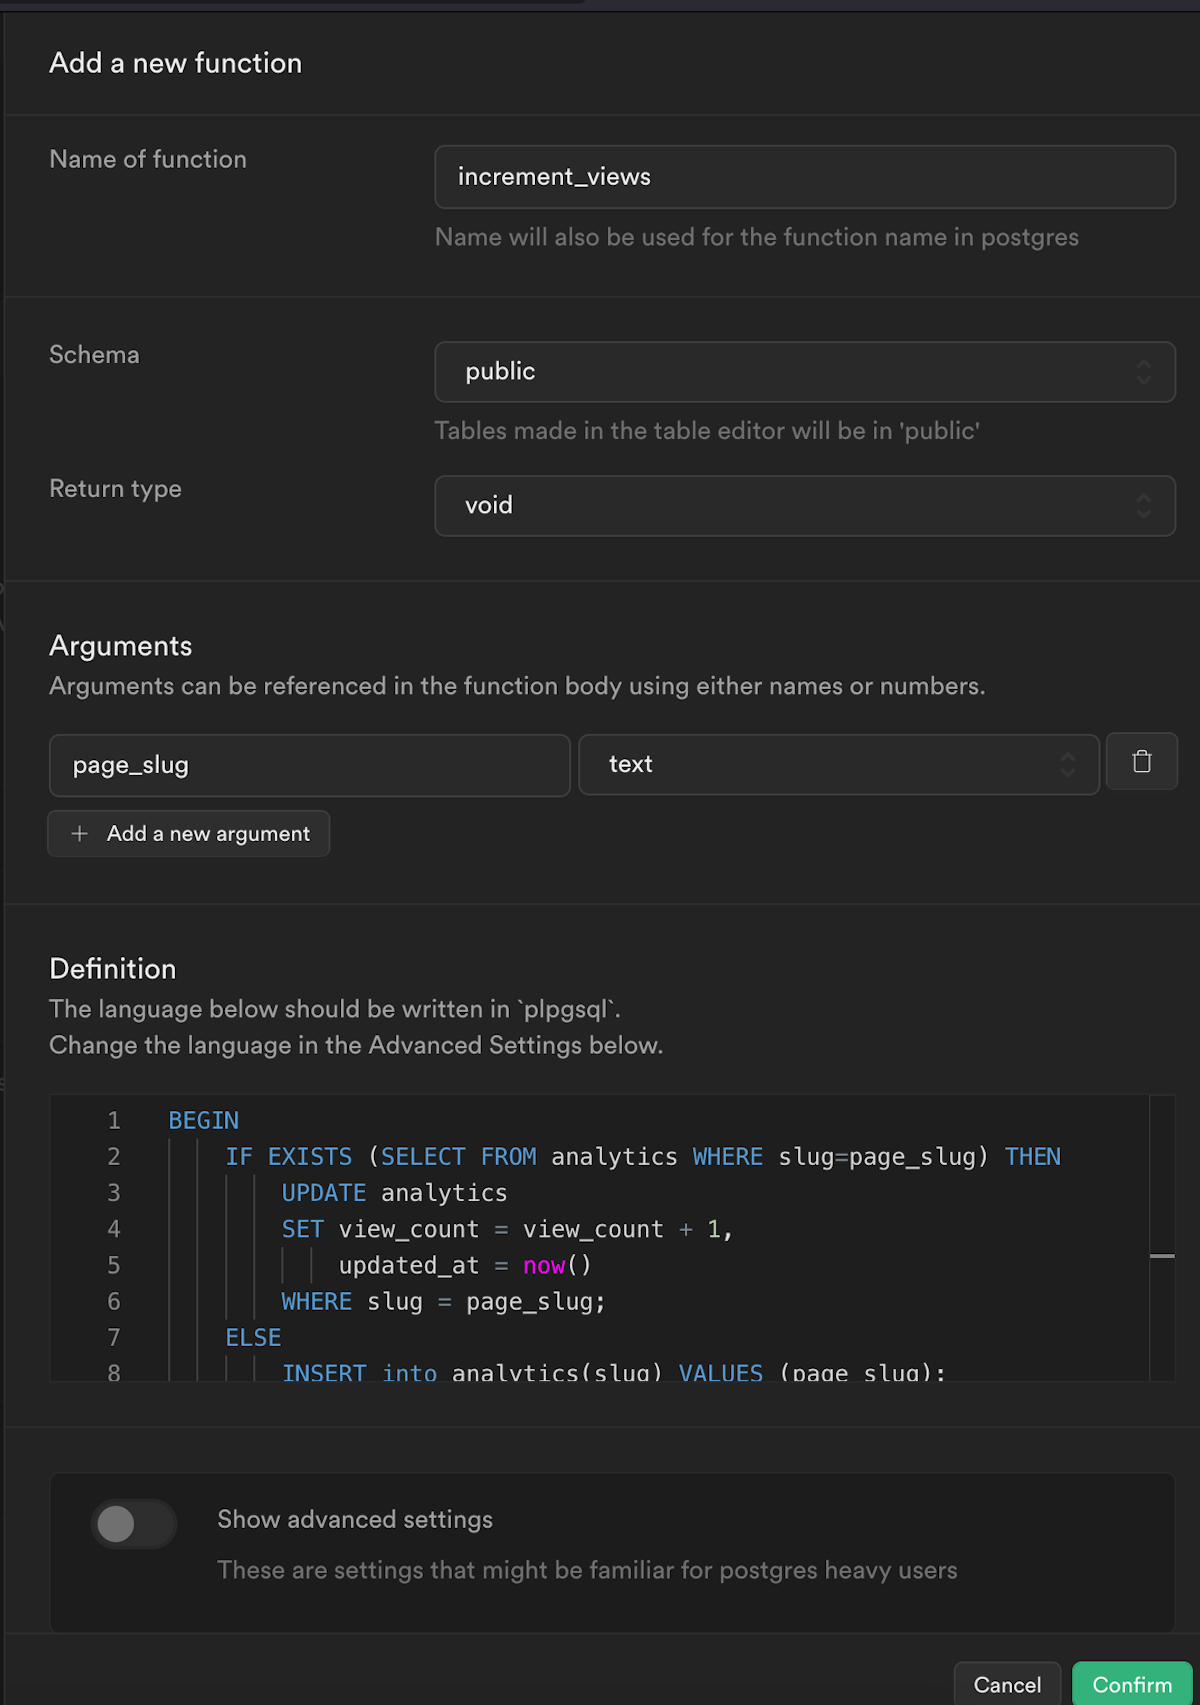
    The query is as follows:

    BEGIN
    IF EXISTS (SELECT FROM analytics WHERE slug=page_slug) THEN
    UPDATE analytics
    SET views = views + 1,
    updated_at = now()
    WHERE slug = page_slug;
    ELSE
    INSERT into analytics(slug) VALUES (page_slug);
    END IF;
    END;
    BEGIN
    IF EXISTS (SELECT FROM analytics WHERE slug=page_slug) THEN
    UPDATE analytics
    SET views = views + 1,
    updated_at = now()
    WHERE slug = page_slug;
    ELSE
    INSERT into analytics(slug) VALUES (page_slug);
    END IF;
    END;

    The function updates the row if it exists (if the page_slug argument is in the slug column), otherwise it creates a new row.

    P.S. I believe I found this query somewhere online but now I can't find the original source — if you recognize it please let me know so I can provide credit!

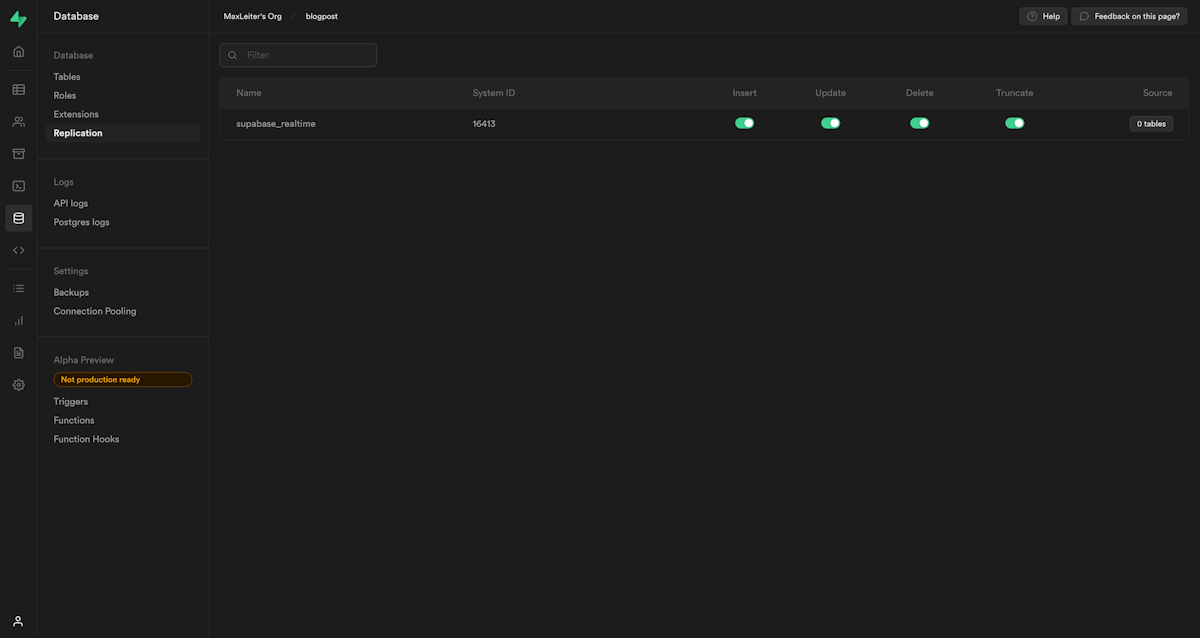
  6. Now we need to enable Realtime so Supabase broadcasts our changes when we subscribe. Navigate to the Database item in the navigation bar and select Replication in the side menu. You should see the following page:
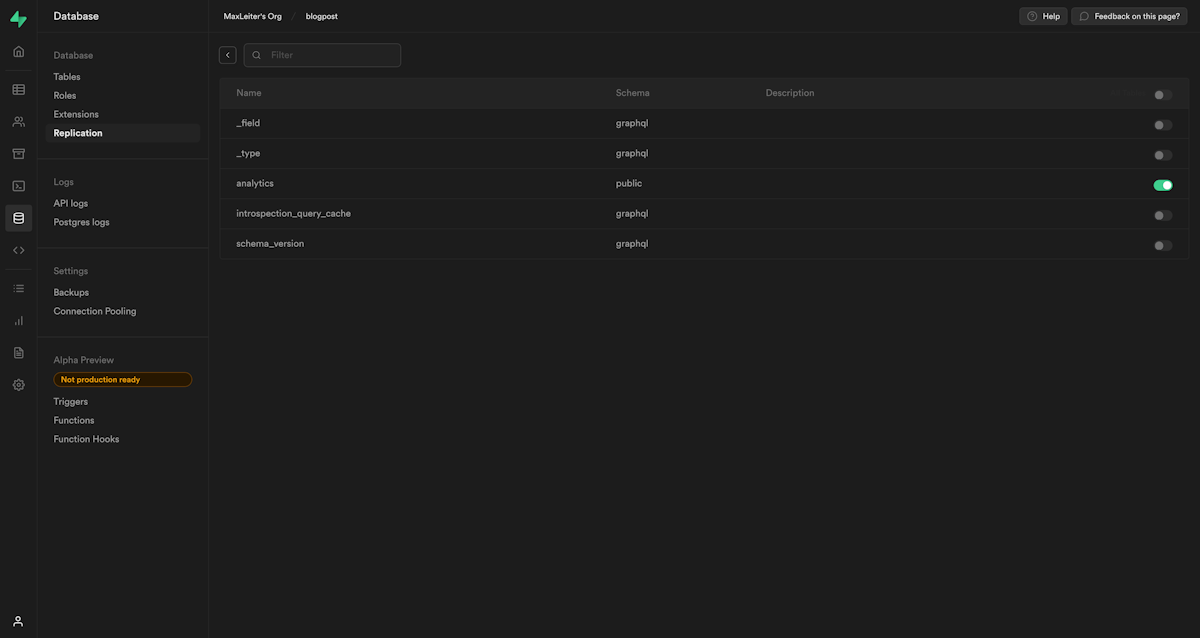
 A screenshot of the empty replication page, showing prepopulated a supabase_realtime row

  7. Click the 0 tables button the Source column and toggle the new table you created (I called mine analytics): The analytics table has been enabled in the replication page

  8. Finally, navigate to the Settings at the bottom of the navigation and select the API submenu. Copy down the anon public API key, the service_role API key, and the project URL in the Configuration box: we'll need them in the next section.

Do not ever expose or share your service_role key — it bypasses row-level security and should only ever be used and seen by your server or you.

Next.js: Adding server-side analytics

  1. First, we need to add the API keys and project URL to our environment, which will let us access them in our code. If you're hosting with Vercel, I recommend using their CLI or dashboard to add the keys, which you can read about here. Otherwise, create or modify your .env file to contain the following:

    NEXT_PUBLIC_SUPABASE_URL=<your URL>
    NEXT_PUBLIC_SUPABASE_ANON_KEY=<anon_public_key>
    SUPABASE_SERVICE_KEY=<service_role_key>
    NEXT_PUBLIC_SUPABASE_URL=<your URL>
    NEXT_PUBLIC_SUPABASE_ANON_KEY=<anon_public_key>
    SUPABASE_SERVICE_KEY=<service_role_key>

    If you're just creating the .env, be sure to add it to your .gitignore so it won't be pushed online.

    For security, Next.js doesn't automatically expose your environment variables to the client. If you want to do that, you need to prefix the key with NEXT_PUBLIC_. This is a great feature, but don't let it stop you from manually verifying you aren't exposing your service key elsewhere.

  2. Add the @supabase/supabase-js package from npm to your project:

    yarn add @supabase/supabase-js
    yarn add @supabase/supabase-js

    or

    npm install @supabase/supabase-js
    npm install @supabase/supabase-js
  3. Create two files, supabase/public.js and supabase/private.js, where you want to; I put them in lib. Private will contain a connection with the service_role key while public will use the anon one. Two files aren't necessary, but I like distinguishing them so I can be sure which I'm using.

    They should each look something like this:

    import { createClient } from '@supabase/supabase-js'

    if (
    !process.env.NEXT_PUBLIC_SUPABASE_URL ||
    !process.env.NEXT_PUBLIC_SUPABASE_ANON_KEY
    ) {
    throw new Error('Missing env vars SUPABASE_URL or SUPABASE_ANON_KEY')
    }

    const publicClient = createClient(
    process.env.NEXT_PUBLIC_SUPABASE_URL,
    process.env.NEXT_PUBLIC_SUPABASE_ANON_KEY
    )

    export default publicClient
    import { createClient } from '@supabase/supabase-js'

    if (!process.env.SUPABASE_URL || !process.env.SUPABASE_SERVICE_ROLE_KEY) {
    throw new Error(
    'Missing env vars SUPABASE_URL or SUPABASE_SERVICE_ROLE_KEY'
    )
    }

    const privateClient = createClient(
    process.env.SUPABASE_URL,
    process.env.SUPABASE_SERVICE_ROLE_KEY
    )

    export default privateClient

    The only difference between private and public is the second argument passed to createClient: change that depending on which you want to use.

  4. Create an API route for submitting views. You could do this directly from the middleware but adding it as a serverless function gives you more freedom to extend it in the future. Also note that anyone can trigger this function, so you may want to protect it by adding a new environment variable and sending that with the request from the middleware. Then, only your server requests will ever have that value and can be verified as legitimate.

    import { NextApiRequest, NextApiResponse } from 'next'
    import supabase from '@lib/supabase/private'

    const handler = async (req: NextApiRequest, res: NextApiResponse) => {
    if (req.method === 'POST') {
    // `increment_views` is the name we assigned to the function in Supabase, and page_slug is the argument we defined.
    await supabase.rpc('increment_views', { page_slug: req.body.slug })
    return res.status(200).send('Success')
    } else {
    return res.status(400).send('Invalid request method')
    }
    }

    export default handler

    The above code is in TypeScript; if you want JavaScript, you can remove the first import and change the function definition to const handler = async (req, res) =>. I included this to try and encourage you to try TypeScript if you aren't already; it's very helpful for exploring unfamiliar APIs, like the Next.js requests and responses.

  5. Create a pages/_middleware.{jsx,tsx} file. The middleware will run on the server before every page request; nothing inside it is ever exposed to the client so we can safely use our private Supabase lib. However, we'll actually just send a POST request to our API handler instead.

    import { NextMiddleware, NextResponse } from 'next/server'
    const PUBLIC_FILE = /\.(.*)$/

    export const middleware: NextMiddleware = async (req, event) => {
    const pathname = req.nextUrl.pathname
    // we ignore running this middleware when the request is to a serverless function or a file in public/.
    // This is purely optional.
    const isPageRequest =
    !PUBLIC_FILE.test(pathname) && !pathname.startsWith('/api')

    const sendAnalytics = async () => {
    const slug = pathname.slice(pathname.indexOf('/')) || '/'

    // Change your production URL!
    const URL =
    process.env.NODE_ENV === 'production'
    ? 'https://maxleiter.com/api/view'
    : 'http://localhost:3000/api/view'
    const res = await fetch(`${URL}`, {
    method: 'POST',
    headers: {
    'Content-Type': 'application/json',
    },
    body: JSON.stringify({
    slug,
    }),
    })

    if (res.status !== 200) {
    console.error('Failed to send analytics', res)
    }
    }

    // event.waitUntil is the real magic here:
    // it won't wait for sendAnalytics() to finish before continuing the response,
    // so we avoid delaying the user.
    if (isPageRequest) event.waitUntil(sendAnalytics())
    return NextResponse.next()
    }
  6. You should now verify your views table is updating by loading pages and viewing the Supabase dashboard. If it's not updating, verify your connection details and try exploring the Supabase logs.

Next.js: Adding a live-updating view counter

  1. Now we can finally add our updating view count. In your React component, import your public Supabase client.

    import supabase from '@lib/supabase/public'
    import supabase from '@lib/supabase/public'
  2. Make views a member of your state:

    import supabase from '@lib/supabase/public'

    const Component = () => {
    // You may want to pass in an initial value for views if you're using getStaticPaths or similar.
    // That way, it won't start at 0 when the client loads.
    const [views, setViews] = useState(0)
    return (...)
    }
  3. Add a useEffect hook to subscribe and unsubscribe to changes on mount or unmount respectfully. This is all it takes to subscribe to recieve the changes made to the analytics table.

    import supabase from '@lib/supabase/public'

    const Component = () => {
    // You may want to pass in an initial value for views if you're using getStaticPaths or similar.
    // That way, it won't start at 0 when the client loads.
    const [views, setViews] = useState(0)

    // Subscribe to view updates.
    // Note that `id` is something I store manually on page creation so I can associate
    // each page with itself from the DB.
    // In practice, I recommend looking into subscribing to low level changes:
    // https://supabase.com/docs/reference/javascript/subscribe#listening-to-row-level-changes
    useEffect(() => {
    const sub = supabase
    .from('analytics')
    .on('UPDATE', (payload) => {
    if (payload.new.id === id) {
    setViews(payload.new.views)
    }
    })
    .subscribe()

    // The return function of a useEffect is fired on unmount
    return () => {
    sub.unsubscribe()
    }
    }, [id])

    return (
    <div>
    {views} {views.length === 1 ? 'view' : 'views'}
    </div>
    )
    }
  4. And there you have it! Automatically updating analytics that don't require JavaScript to be recorded! You can verify it works by opening the page in a new tab.

Next steps

There's quite a lot you can do from here, but here are some recommendations:

  1. Only allow unique visitors, perhaps by storing IP hashes or using localStorage. This could probably be accomplished with Supabase Edge functions?
  2. Build a visualization page for interacting and querying the results
  3. Expand your analytics to include things like keeping track of the referer value.
  4. Ignore certain user agents to reflect a more accurate view count

Thanks for reading! If you want to see future content, you can follow me on Twitter or subscribe to my RSS feed.